Today's post is brought to you by the letters D-I-Y!
It's no accident that the word tipidity contains those letters, lol. Marlon and I were forewarned by Europe-based friends that we would have to get very handy around the house very fast if we wanted to save money, and it's true. Nothing makes you realize how spoiled we Asians are like furnishing a European house on a, well, Asian budget.
There was no way we were carting these Ikea Pax closet elements home with us on the train (taxi? what taxi? We're in Europe, remember?), so we splurged on delivery for less than €50. But when we were told that hiring someone to assemble them would cost at least €250, Marlon decided to take things into his own hands... literally.
He bought his first power drill and spent the better part of a Sunday assembling our closets. We had door-less closets for about a week and a half, because attaching the doors would require the three closets to be screwed together into one large unit. And that would make it hard for us to move the closet around when we painted the bedroom.
Assembling the closets brought out Marlon's inner handyman. He would do simple things before like change bulbs and hang frames, but often left anything more complicated to hired help—which is no longer an option here. He's gotten a lot more confident using power tools and gets really enthusiastic about my ideas for DIY projects.
What a revelation this whole process has been. Suddenly it's like all of life's questions can be resolved with a power drill. Now we can look at a piece of furniture or fixture that we like and go, "Madali lang yan! Kailangan lang natin mag-drill." Which is how two ladders and a few wooden planks almost became a bookshelf... almost. But that's another story.
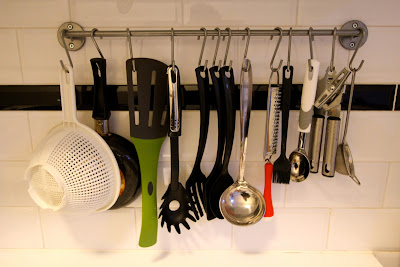
One of his mini-projects was installing a bar with S-hooks (again, thank you Ikea) for our kitchen utensils, right beside the stove. I love this because it frees up so much drawer space and makes everything easy to grab.
Our biggest DIY project to date has been the repainting of the bedroom. Both of us had decided early on that we were done with living in white boxes, a fate that most renters are doomed to endure. Luckily, our landlord agreed to let us paint the walls, provided that we return them to white if he should so decide at the end of our lease.
At €45 per hour for a professional painter, for a job that would take at least eight hours, it was easy for Marlon and I to decide to go DIY. He did some research on painting equipment and techniques online, then bought everything we needed at Gamma, Holland's version of Home Depot.
Having saved on labor, we then decided we could splurge on paint. Well, I decided. My obsessive online research had led me to Farrow & Ball paints, and somewhere between their poetic product names and and rich hues, I fell in love. I've always, always wanted an intense color on my bedroom walls, so I was immediately drawn to Drawing Room Blue. Marlon was totally on board with it; I think he was just glad I didn't want anything too girly.
At €119 per 5L can (one would cover our 30 sqm walls), plus another €109 for the recommended primer and undercoat, we could definitely have gotten something a lot cheaper, but you can't fight love.
The actual painting took up an entire weekend, starting with an hour on Thursday evening to move out all the furniture and mask the ceiling, floor and windows with tape. Friday night was spent slathering on the primer, which took about three hours.
Teka, puro si Marlon pala ang nasa pictures. Baka isipin ninyo na sitting pretty lang ako. Ako kasi ang taga-document at tagaluto. Pero nagtatrabaho ako, promise.
Using the rollers was super fun and made our job easier than expected. We got shaggy lambswool rollers for €2 each; if not for the Interwebz, we probably would have gotten cheapo foam rollers na parang pangkulot, lol.
We left the primer to dry all of Saturday and returned to do the first and second coats of paint on Sunday morning. Halfway through the first coat, Marlon and I found ourselves thoroughly pleased with our choice of paint. The best thing about Farrow & Ball paints are that they are water-based. No thinner, no awful fumes, and so easy to clean up paint splatters! Just a damp rag and a little elbow grease, perfect for DIY newbies like us.
And the color... the color!!! Deeply pigmented, with a soft sheen... *colorgasm* I suggested diluting the second coat slightly, which made it even faster to paint on. The second coat totally smoothed out the slight imperfections and uneven-ness of our first coat.
By the time we were done on Sunday night, Marlon and I were grinning like idiots. We had spent a total of 12 hours, shelled out €263 (for the primer, paint and delivery), and saved €540 on labor for a paint job that was on track to make our bedroom look and feel like a million bucks. And we had just gotten our first taste of the DIY euphoria that money just can't buy.
Next up: the new and improved bedroom... revealed!


No comments:
Post a Comment